
How I made a Chat Bot ?
- Shubhankar Nath
- Tech
- May 17, 2020
There are a lot of platforms to develop a Chatbot in the market today, some where you do not even need to write a single line of code. Here is a guide of what I used to make a simple bot for my website (Update: the project has seen a sunset on Dec 2022). I have made the guide in a sequential manner of steps you need to follow while explaining a few learning along the way.
Selecting the tools
This is where a there are a lot options present. I decided to go with the Microsoft Bot Framework. It has state of the art integrations powered by Azure and a very active community who has fine polished a great deal of documentation. So here are the following things I used to make this project:
- Visual Studio 2019+ with .NetCore 3.1
- Bot Emulator for testing.
- Azure Subscription for hosting
Architecture
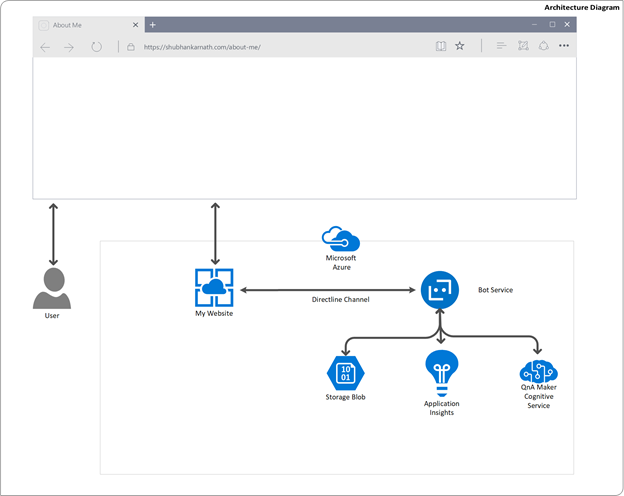
This is very basic layout of bot infrastructure I implemented. The Bot is hosted as an independent app service, and embedded into my website. The entire setup including the Bot, Website, and other services costs me under 3000 INR per month (as of May 2020).
Initial Setup
This is what makes Microsoft Bot Framework a brilliant choice. You can get enough sample templates to get started with for nearly all the scenarios you can imagine. There is also an array of cognitive services you can consume through API offered my Microsoft.
Step 1: Clone an appropriate template from the samples repository. I picked qnamaker-all-features from the repository. Also, setup Bot Emulator without which we cannot test it. It has all the necessary features fed into it.
Step 2: Install the missing packages (if any) and run the bot locally. Yes, it will run straight out the box. When you run it, it will open up a static page. Somewhat like this
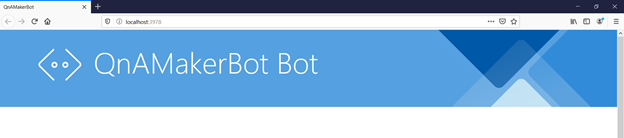
To make a conversation with the bot, you need to setup the bot emulator. Click on New Bot Configuration from the File menu and in the Endpoint URL field, enter the port your popped up browser has opened to followed by /api/messages. For example in my case it will be : localhost:3978/api/message. (See the screenshot)
Cognitive Service
Cognitive service is the element that makes a Bot take commands in natural language. In my case, I am only using QnAMaker. QnAMaker is a cognitive service that adds a conversational layer of questions and answer to existing data. It forms a knowledge base in a pattern of pairs of questions and answer. It can extract data from excel sheet, website or even wiki pages. For this demo we need to build one. This is by far the most time-consuming section. In my case, I trained it QnA maker with answers in JSON format which I can use and alter the way in which they are presented.
Step 3: Make a knowledge base using QnA maker and Publish it. The Json Schema I used here is:
{
  "qnaId": null,
	// The identity field of my pairs
  "type": null,
	// Different Types in which I need to handle the respone e.g image, text, card etc.
  "content": null,
	// The content of the reply
  "media": null,
	// In case I wanted to add any media to my responses
  "property": null
	// A placeholder to add any extensions that I want to implement later. Always make your code extensible.
}
Step 4: After publishing your knowledge base, you will get publish setting, use the setting to update your appsetting in the following fields.
{
    "QnAKnowledgebaseId": "7af6a72d-****-4ba8-9a81-2d7****031b0",
    "QnAEndpointKey": "e11d5c12-****-4c7c-98ca-b0e****f9f09",
    "QnAEndpointHostName": "https://****.azurewebsites.net/qnamaker",
}
You will have a fully functioning Bot by now, just that it will have responses in JSON format, we need to customize that.
Customizing
All the customizing section for this Bot I have written as separate Class libraries making at as modular as possible.
Handling Different type in response
I wrote a method - ContentSelector – to handle the different ways I want to respond.
Type = Multi_Response: There is an array of response, just select any one to keep responses a bit varied.Type = Card_Response: Use the media section to render an adaptive card, which we will discuss later.Type = Image_Response: Send an image instead of text in response.
I might other type and handling mechanism accordingly as I go.
Step 5: Add a class library and write a method to handle the JSON Response for from QnA maker and parse the reply to user.
public static Activity getAnswer(Activity customResponse,string responseJson, IBotTelemetryClient telemetryClient)
        {
            Answers answersHolder = null;
            try
            {
                answersHolder = JsonConvert.DeserializeObject<Answers>(responseJson.Trim());
            }
            catch (Exception e)
            {
                telemetryClient.TrackException(e, TelemetryMetaData.BindExceptionEvent(TelemetryKey.JsonDeserializationError,"QnA Answer Json to Answer Model"));
            }

            switch (answersHolder.Type)
            {
                case "Multi_Response":
                    customResponse = MessageFactory.Text( answersHolder.Content[RandomSelector.Rand(answersHolder.Content.Count())]);
                    break;
                case "Image_Response":
                    try
                    {
                        var response = customResponse.CreateReply();
                        response.Attachments = new List<Attachment>() { CardMaker.getCardAttachment(CardMaker.getImage_ResponseCardJson(answersHolder)) };
                        return response;
                    }
                    catch(Exception e)
                    {
                        telemetryClient.TrackException(e, TelemetryMetaData.BindExceptionEvent(TelemetryKey.CardRenderError, "Image_Response card error", customResponse.Conversation.Id,responseJson));
                    }
                    break;
                case "Card_Response":
                    try
                    {
                        var response = customResponse.CreateReply();
                        response.Attachments = new List<Attachment>() { CardMaker.getCardAttachment(CardMaker.getCard_ResponseCardJson(answersHolder)) };
                        return response;
                    }
                    catch(Exception e)
                    {
                        telemetryClient.TrackException(e, TelemetryMetaData.BindExceptionEvent(TelemetryKey.CardRenderError, "Card_Response card error", customResponse.Conversation.Id, responseJson));
                    }
                    break;
                default:
                    customResponse = MessageFactory.Text(answersHolder.Content.First());
                    break;
            }
            return customResponse;

        }
Step 6: Add a model class to deserialize the Json received from QnA maker into an object.
public class Answers
    {
        public string QnaId { get; set; }
        public string Type { get; set; }
        public IList<string> Content { get; set; }
        public IList<string> Media { get; set; }
        public string Property { get; set; }
    }
Handling Dialog
The Bot framework has a concept called Dialog to handle conversation flow. As the name states it is conversation between two entities, user and the bot. When a user starts a conversation, it enters the root dialog and then based on the response it can get directed to other dialogs. For example, your bot can do two features – book hotel and book flight tickets then you would have the root dialog pass the control the BookHotelDialog or to BookTicketDialog based on what user wants. In my case I have only one Dialog - QnAMakerBaseDialog to converse with QnAMaker service. Each Dialog on it’s own can follow a waterflow model i.e a sequence of methods a conversation has to go through.
Step 7: Add the code to intercept he response from QnA maker and parse it according to the logic of ContentSelector. You can write this section in the DisplayQnAResult method inside QnAMakerBaseDialog class. Here is my method:
if (stepContext.Result is List<QueryResult> response && response.Count > 0)
             {
                if (!response.First().Answer.Contains("{"))
                {
                    await stepContext.Context.SendActivityAsync(response.First().Answer, cancellationToken: cancellationToken).ConfigureAwait(false);
                }
                else
                {
                    var customResponse = ContentSelector.getAnswer((stepContext.Context.Activity).CreateReply(), response.First().Answer, TelemetryClient);
                    await stepContext.Context.SendActivityAsync(customResponse, cancellationToken: cancellationToken).ConfigureAwait(false);
                }

            }
            else
            {
                await stepContext.Context.SendActivityAsync(qnaDialogResponseOptions.NoAnswer, cancellationToken: cancellationToken).ConfigureAwait(false);
            }
Adaptive Cards
Adaptive cards are a fixed JSON to render in a lot of Microsoft platform tools like Bots, Teams or outlook. You can use it display card to you user. Also a welcome message is really cool.
Step 8: Goto https://adaptivecards.io/designer/and make your card. Copy the Json into a file in your project and set the property of the file to always copy.
Step 9: Goto QnABot.cs and the following code in the method – OnMembersAddedAsync. This is the method that gets invoked whenever a new conversation is has started, the concept draws parallel to new session in a web application.
Service
The Bot Framework uses .Net core and it leverages it’s seamless Dependency Injection mechanism to the fullest. Every service is directly injected into Startup.cs . We are going to add Telemetry logging into it. Logging the conversation is a bot is a great way to find analytics on what the users are asking and whether it is showing some error or not.
**Step 10.**1: Add instrumentation key of application insight in app setting.
 "ApplicationInsights": {
    "InstrumentationKey": "363f85bd-****-4ee5-9ee2-5026****75ed"
  }
Step 10.2: Add the following lines in Startup.cs and resolve any dependency.
// Create the telemetry client.
services.AddSingleton<IBotTelemetryClient, BotTelemetryClient>();

// Add telemetry initializer that will set the correlation context for all telemetry items.
services.AddSingleton<ITelemetryInitializer, OperationCorrelationTelemetryInitializer>();

// Add telemetry initializer that sets the user ID and session ID (in addition to other bot-specific properties such as activity ID)
services.AddSingleton<ITelemetryInitializer, TelemetryBotIdInitializer>();

// Add the telemetry initializer middleware
services.AddSingleton<IMiddleware, TelemetryInitializerMiddleware>();

// Create the telemetry middleware to initialize telemetry gathering
services.AddSingleton<TelemetryInitializerMiddleware>();

// Create the telemetry middleware (used by the telemetry initializer) to track conversation events
services.AddSingleton<TelemetryLoggerMiddleware>();
Step 10.3: Change the constructor of the dialogs to use the telemetry client.
public RootDialog(IQnAMakerConfiguration services, IBotTelemetryClient telemetryClient)
            : base("root")
        {
            AddDialog(new QnAMakerBaseDialog(services, telemetryClient));

            AddDialog(new WaterfallDialog(InitialDialog)
               .AddStep(InitialStepAsync));

            // The initial child Dialog to run.
            InitialDialogId = InitialDialog;
            // Set the telemetry client for this and all child dialogs.
            this.TelemetryClient = telemetryClient;
        }
All dialogs are derived from Component dialog, which when given a client will automatically enable basic logging. For custom events you might need to write your own methods.
Deployment
The complete source code is here : https://github.com/Shubhankar-Nath/AboutMeBot
I used Azure Pipelines to deploy it to my App service. You can it by adding as an plugin from GitHub Marketplace. There are various options on how to trigger and deploy, for me whenever I merge a pull request to my master branch it will trigger a build and upon success it will also deploy the latest build. I practically never need to move out of Visual Studio to introduce any change, a developers Swiss knife!


